
 |
|
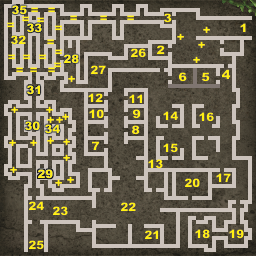
Legend:
Spells Special Items People Monsters Quests |
| 1. | zone - The Geneforge | 21. | Nest has Thorns. |
| 2. | Essence Pool. The door to this room requires 2 Living Tools at 12 Mechanics. | 22. | Ur-Glaahks and Drayks wander the main part of this zone. The corpses at the west end of this room have a Steel Sword, a Steel Breastplate, a Grounded Tunic, a Tranquil Baton, Tranquil Thorns, Speed Spores and a Fine Robe. |
| 3. | The door on the east requires 2 Living Tools at 12 Mechanics. The pylons in the room to the east are peaceful if you arrived from area 1 or through the door to area 4. If you come from the hall to the west, they attack. | ||
| 4. | This door requires 8 Living Tools at 12 Mechanics. | 23. | 4 Burning Turrets |
| 5. | Drayk. Spray Crystal, Blast Cyrstal, Rough Crystal, 2 Cyrstals and 50 coins on ground. | 24. | Door requires 1 Living Tool at 12 Mechanics. |
| 6. | Airshock Crystal, Crystal, Rough Crystal, Icy Crystal and 50 coins on ground. | 25. | zone - Central Labs |
| 7. | Nest with Living Tool. | 26. | Healing pool (behind spiked barrier) |
| 8. | Nest with Living Tool. | 27. | Dead Servant Mind. There is a control panel with 8 switches here:
The cabinet contsins Mind Nutrients. |
| 9. | Nest with Essence Pod. | ||
| 10. | Nest with 50 coins and Shaper Tools. | ||
| 11. | Nest with Major Healing Pod. | ||
| 12. | Nest has Airshock Crystal. | 28. | Danette's Shade (recorded message). The shade can tell you why the island was abandoned. If you have enough Leadership, it can also tell you how to use the Geneforge. |
| 13. | Cabinet has a Discipline Wand. | 29. | Spore Switch. Turns off some Pylons, making a safe path to the switch in area 30. |
| 14. | Nest with 20 coins and Shaper Records | 30. | Spore Switch. Turns off enough of the fire pads to reach the switch in area 32 |
| 15. | Nest contains a Healing Pod, a Curing Pod and a Thorn Baton. | 31. | Door requires 4 Living Tools at 12 Mechanics. |
| 16. | 5 Cockatrices. The next contains a Rod of Alacrity. | 32. | Spore Switch. Turns off enough fire pads and pylons to reach switches 33 and 34. |
| 17. | Use the control panel in area 27 to open the door to this room. Canister: Searer + 1. 3 Shaper Records on floor. | 33. | Spore Switch. Turns off enough fire pads to reach switch 35. |
| 18. | Experimental Glaahk. Drops an Agent's Shelter shield. | 34. | Turns off enough pylons to reach spore switch 29. |
| 19. | Use the control panel in area 27 to open the door to this room. The book here gives a little bit of history on the Glaahk in the next room. The Pylon here will fight on your side should you manage to lure the Glaahk in here. | 35. | Spore Switch. Turns off enough fire pads to reach area 28. (The hallway leading to area 3 has additional switches that will clear the way there as well). |
| 20. | Box on left requires 4 Living Tools at 12 Mechanics. It contains a Discipline Wand. The box on the right also requipes 4 Living Tools. It contains a Restoration Pod and Shielding Spores. On the table there is a Thorn Baton, a Venom Baton, a Tranquil Baton, a Spray Baton, Venom Thorns, Tranquil Thorns, Reapers, Splitting Thorns, Javelins and Steel Javelins. | + | Pylon (or two) |
| = | Fire Pad | ||