 |
|
|
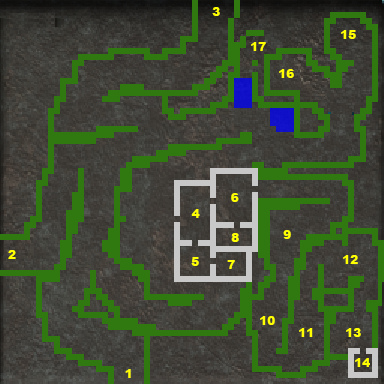
| 1. | To Drypeak Fields | 9. | Experimental Fyora. This has 10x the health of a normal fyora and can spawn 2 normal fyora to help it. Defeating it increases the Physical and Magical Arrmor boost of Sharon's Bracelet by an additional 1% and adds Strength +1. |
| 2. | To The Crags | 10. | Experimental Vlish. Spawns Specters to help it. Boosts Sharon's Bracelet by an additional 1% and adds 5% creation magical damage resistance. |
| 3. | To Western Mines | 11. | Experimental Bug. Looks like a clawbug with 1331 hit points and 100% resistance to mental and stun attacks. Boosts Sharon's bracelet by adding + 5% to lifedrain. |
| 4. | Sharon is here. If you ask the right questions, she will offer you the contents of area 6, let you read the spellbook in area 5, and offer you two quests:
However, she absolutely forbids you from entering her room (area 7). She also offers to make a powerful magic ring for you, if you can find the following components:
The ring created is the infiltrator's ring (Agility +3, Stealth +2, Leadership+2, Mechanics +2). |
12. | Experimental Turret defended by a Spinecore and 8 Spines. Defeating it increases the Physical and Magical Arrmor boost of Sharon's Bracelet by an additional 1% and adds Healing Craft +2 and +5% to creation magical rersistance. |
| 13. | Experimental Gamma and 3 Ur-Glaahks. Defeating the gamma increases the Physical and Magical Armor boost of Sharon's Bracelet by an additional 2% and adds +1 to Quick Action. | ||
| 14. | The jars here contain a major healing pod, a shielding pod, 2 blast crystals, and a restoration pod. One of the blue containers has a jar of purified essence. | ||
| 5. | There are two books on stands here:
The chests contain 2 living tools and an amethyst (both NY). |
15. | There is saltweed here. Elila in Drypeak will give you a quest to retrieve this. |
| 6. | Discipline wand and shielding pod on the table. Living tool in the jar. Icy crystal in the vat. The door on the east takes a large number of living tools to open. But, Sharon will give you the key when you complete her guarded tunnel quest. |
16. | 2 rats and a scavling scavenger. A pair of heavy boots can be found on the ground. |
| 7. | Sharon's room. The door takes 3 living tools at 11 Mechanics. There are 2 Turrets here. Here cabinets contain 240 coins, 4 crystals, a reaper baton and an amethyst. Surprisingly, only the amethyst is NY. | 17. | The region is initially inaccessable. But, if you're on a quest to find some tall shrubberies, Sharon may open a path to it for you (apparently she keeps them here). There are also Rats here. |
| 8. | It may take a small number of living tools to open the door to this room. One chest contains 4 icy crystals. Another contains a topaz, a sapphire and a madness gem (all NY), but you can take the shielding knife. A third chest contains 2 living tools. A 4th chest contains thorns and venom thorns. |
||